

As of July 2023, many Segment customers using a HubSpot destination will have to have migrated to the new HubSpot Actions Destinations. The reason for this forced migration is the sunsetting, by HubSpot, of their API key approach. On June 1st, 2022, HubSpot announced their API key sunset giving their customers until July 14th of that same year to create new API keys. From July 15th onwards, OAuth2.0 will be required.
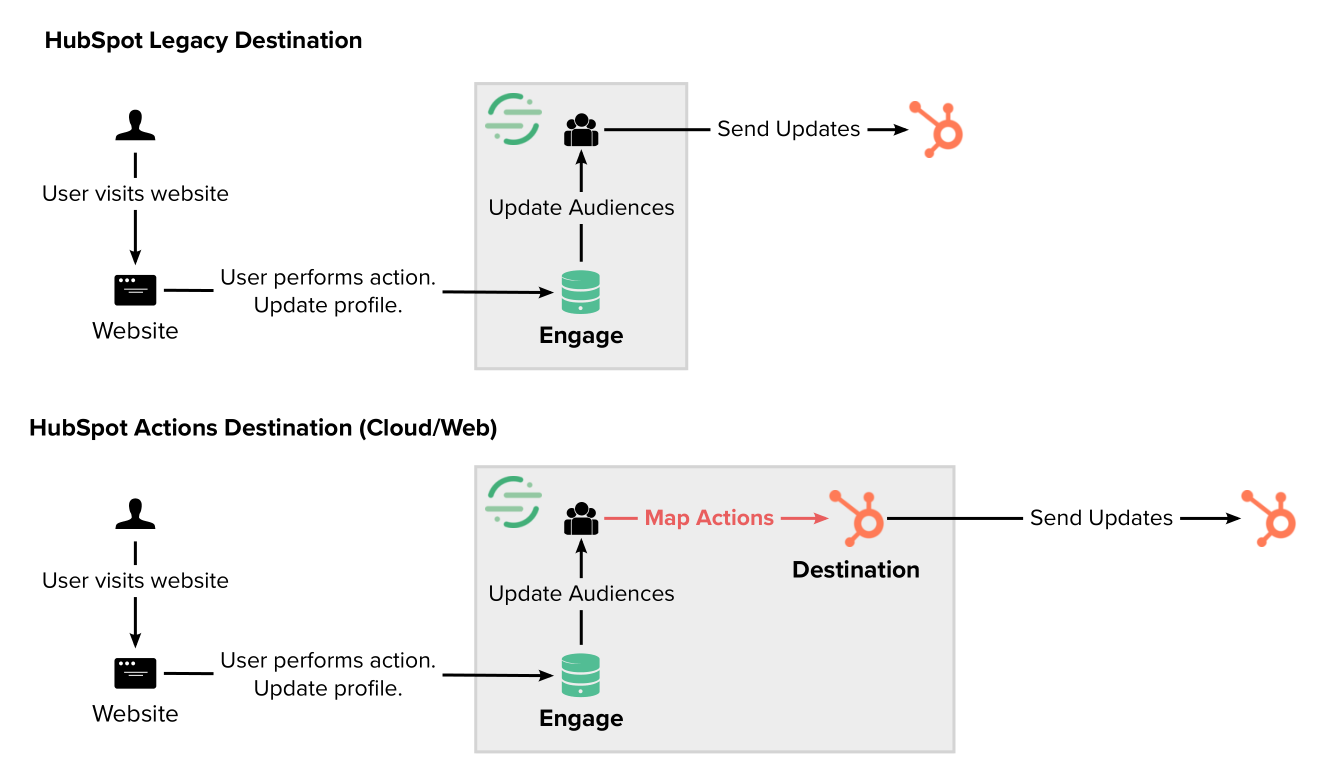
Segment’s, now legacy, HubSpot Destination was easy to set up and would automatically interact with Engage (formerly known as Personas) to keep your audiences in sync. As an infrequent user of HubSpot myself, it took time to properly understand the impact of this and how to migrate to the new HubSpot Actions Destinations for both device and cloud mode.
How to send Segment Audience updates to HubSpot contact properties?
Not much has changed between the Legacy and new Action Destinations for HubSpot. Apart from using their new OAuth2.0 authorization method, you will only need to define which custom properties you want to send with the Upsert Action. In the past, you would only need to set up the destination and enter the API key, and you were done. There is more work to do that will give you more control, something that Data Governance will benefit from.
HubSpot Actions Destination Step-by-Step Guide
Please follow these steps the first time you set up a HubSpot Action Destination and when you create a new (subsequent) Segment Audience.
1 In Segment, in the Engage > Audiences section, click Create (1) and build your audience:

2 Copy the audience key of your newly created audience
In Segment, go to Enage (1), select the audience you just created (2), and click the Settings tab (3).
When your audience is created, Segment will transform the audience name into a lower/snake case name (4).
e.g., My New Audience will be transformed into my_new_audience

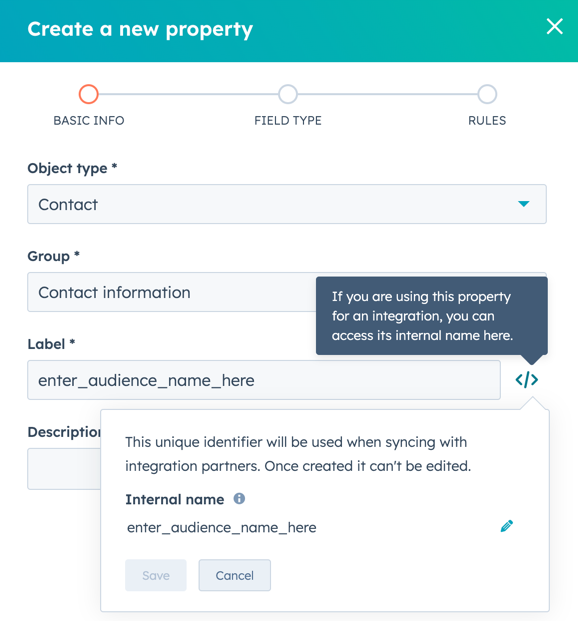
3 In HubSpot, create a new property.
The Object Type does not matter.
In the Label field, paste the audience key you created and copied in Segment.
Enter a description, fill out the remaining fields and tabs, then Save.
4 In HubSpot, review your property settings
In the Edit property tab (1), you can check that the label field (2) is filled. Then, to the right of that field, click on the </> symbol to review the Internal name (3) and check that it matches the Segment audience key for that specific audience.

5 In Segment, go to Profiles > Profiles Settings > Select the connected Source
This step will show you events coming into the Profiles space from a specific source (Profiles receive and process data from Segment sources). The example below shows that we are on an Engage Sources page (1). Click on the Debugger tab (2) to view the data streaming. Since HubSpot requires an email address to receive data from external sources, you must select an Identify event (3) with an email address.
TIP If the flow of data is too fast, use the Advanced Filter, select Full Payload, then search for “email”:
You can see the payload when you click on a valid Identify event. Click on the Raw tab above the payload data.
In the payload, scroll down there (if everything is working correctly and your audiences are being processed), and you should see data in the traits object (4). Our goal is to leverage the <audience_name>:<boolean> value in our HubSpot Actions Destination.

6 Start configuring your HubSpot Actions Destination
Create or open a HubSpot Actions Destination in Segment. Make sure it is connected to the source you want to process data from.
Check to ensure you are working in the right Destination (1). Then, click on the Mappings tab (2), select the Action you want to edit (3), or add it.
For this guide, the Upsert Contact action works best. Click on the three dots “…” (4) and select Edit Mapping.

On the Mapping page, build out the conditions needed. We are looking for audience updates and as mentioned before, HubSpot requires an email address.
The conditions I used are:
ALL conditions must be true:
- Event Type IS “Identify”
- Event Trait “email” EXISTS
- Event Trait “email” CONTAINS “@”
The last conditional was set for this client since it was sometimes populated without the ampersand character. Please always make sure to check and test what works best for you.

Please scroll down until you see an area where you can Load Test Events from Source, then click the button.
If everything is working correctly, you should see an actual payload load. In the payload, check to see if the traits object contains an email address and an audience name parameter(1). We will use these values in the next step to build the Mapping.

Scrolling down even further, you will see the parameter mapping fields. Email should be extracted automatically.
For this guide, we have some manual work to do. Due to some limitations in the Segment UI, we need to manually extract the audience key we want to track and add them to the Other properties field one-by-one (1). This can take some time if you have many audiences that need to be synced, so work securely.
The key field can be auto-populated if the payload from the previous step includes the data you need.
In this case, the order_completed_last_21_days parameter has a false value. So, in the left column, I manually add the parameter key, but in the right column, I use the autocomplete feature that pops up and finds the necessary value.
On the right-hand side, you should see an example of what the Mapping will look like. For audiences, it should look something like this (2).

TIP Since the autocomplete feature only works on what is in the payload, I recommend you copy the payload and add all the audiences (1) you want to track before building out this Destination. This will allow you to copy and paste all the audience key values from the payload and use the autocomplete feature for each row (2).

Now it is time to review and test. Check the bottom of the Mappings page, verify the data you will send/test (1), and click Test Mapping (2).

7 Verify that HubSpot has received the data
If all goes well, you should not see an error message on the Mappings page in Segment. If so, please go ahead and return to the previous steps and check your work.
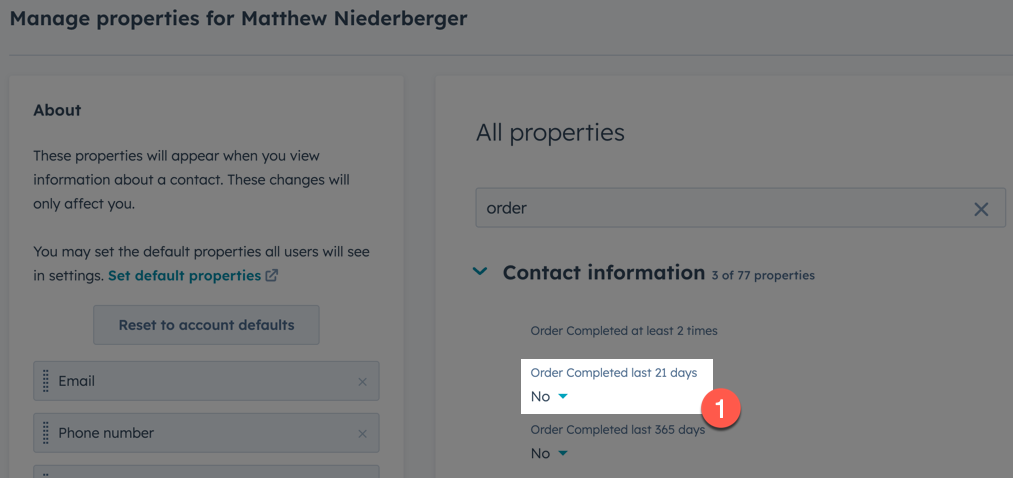
In HubSpot, you can check to see if the data has been added to the contact. Under Contacts, find the contact you tested with and click on View Properties (1).

Then, filter the properties by (partially) typing the name of the audience you created in HubSpot and linked to the audience key.
You should now see the property show up and the value that was set (1).
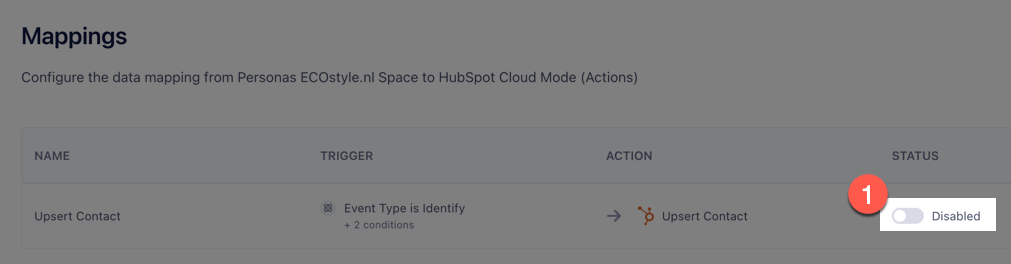
8 Return to Segment and enable the HubSpot Actions Destination
The last step is to enable the destination.
Conclusion
That’s it. Good luck with the HubSpot OAuth2.0 migration in Segment. I hope you have learned more about Segment and how to use Actions Destinations in combination with Engage Audiences. Connecting a Source to Engage, to build Profiles is a powerful feature in Segment. Although some more manual work is involved in syncing audiences with solutions like HubSpot, Iterable, etc., the control will benefit your understanding of what is sent and where.
If you have any questions, please don’t hesitate to contact me.


